Use Case: Risk Aware Image Generation with Stable Diffusion
In this tutorial, we demonstrate how you can use capsa-tensorflow in the real world (as part of a larger codebase). To that end, we show an example of making a Stable-Diffusion model risk aware by integrating capsa-tensorflow into keras-cv repository. This enables us to reuse 3rd party’s (in this case keras’): model definition, hyperparameters, and utilities for running the model, instead of needing to define these from scratch. We also present the updated keras-cv with the capsa-tensorflow integration, which you can find here.
The approach of integrating capsa-tensorflow into larger codebases can be applied to any other repository. In this tutorial we use keras-cv as just one illustrative example among many such potential use cases.
We also published our work on different ways to integrate capsa-tensorflow with Stable Diffusion here.
What is Stable Diffusion?
Stable Diffusion is a diffusion model that has the capability to generate images via text prompts.
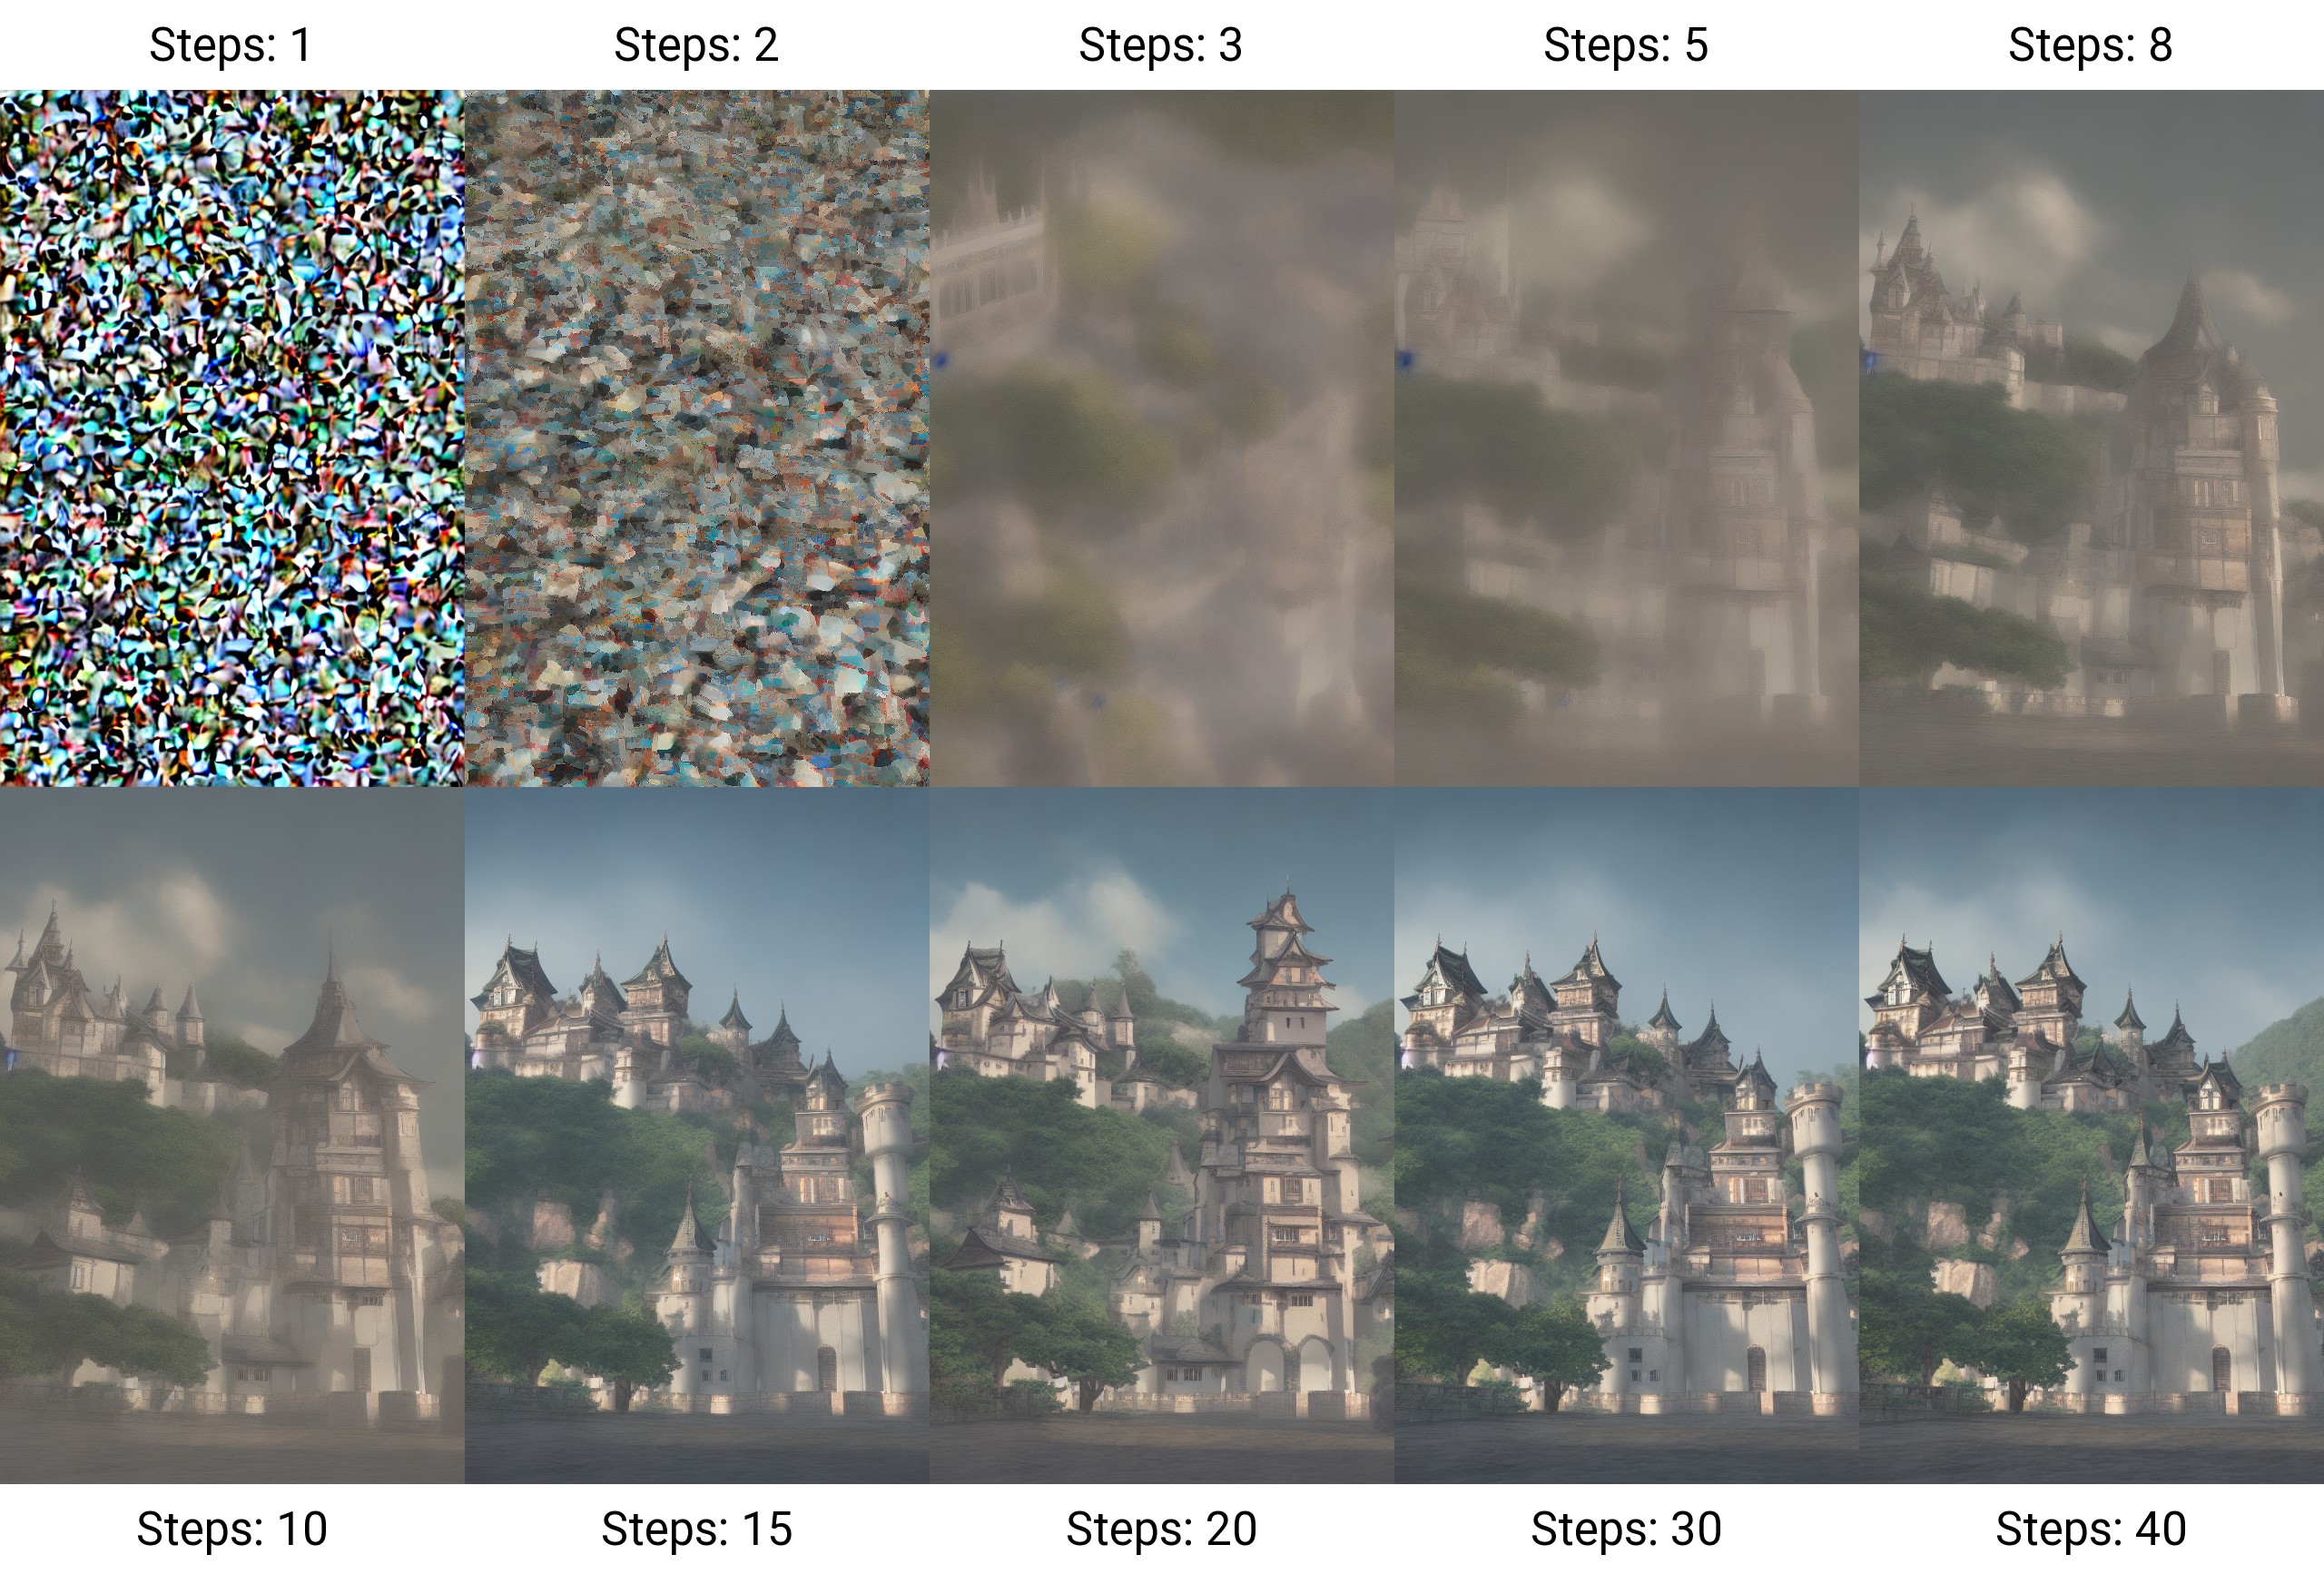
The model is trained take a compressed (latent) image that only consists of pure noise. It iteratively removes noise from this image to generate the final image. This noise removal process (backwards diffusion) is guided by a given text prompt, which is encoded via a text encoder.
Wrapping Stable Diffusion with Capsa-Tensorflow
Wrapping Stable Diffusion with capsa-tensorflow allows us to add risk-awareness to the Stable Diffusion model. This means that the wrapped model is able to output not only the generated image as it originally would, but also the model’s confidence in each generated pixel.
In this example, we only wrap the decoder part of the model. This decoder takes the latent image at the end of iterative noise removal process, and decodes it to a human interpretable image. Imagine the diffusion model as a book writer that keeps re-writing their book until it is perfect from storytelling perspective. However, it is still a mess and not human readable. The decoder is the editor that takes the final draft and polishes it to make it ready for publishing so other people can view it.
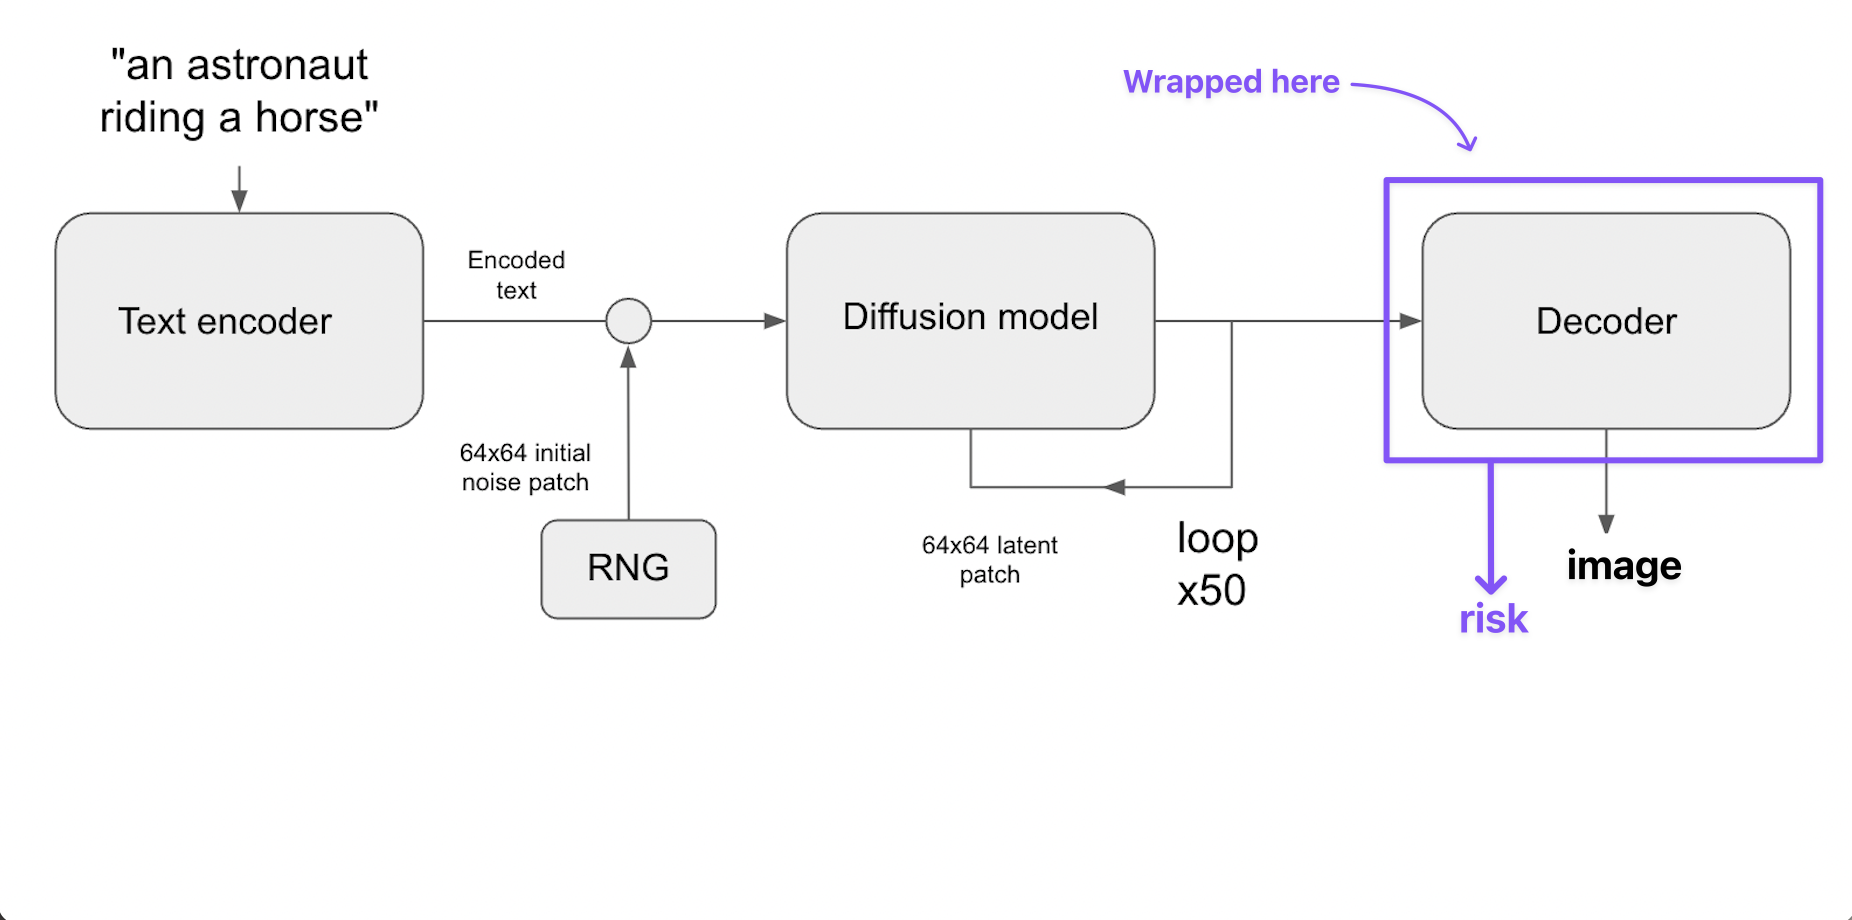
We have also experimented on wrapping other parts of the model, which you can find in our paper.
Changes to the keras-cv repository
Our changes to the Stable Diffusion are implemented in the StableDiffusionBase class definition. This class is reachable via the path keras_cv/src/models/stable_diffusion/stable_diffusion.py in the keras-cv repository.
First, we import tensorflow and capsa-tensorflow.
+ import tensorflow as tf
+ from capsa_tf import sample, vote, sculpt
In the original StableDiffusionBase __init__ function, the decoder attribute is left as None. Since we are wrapping the decoder before we use it, there’s no point in using property functions to later define this attribute. Therefore, we can initialize the Decoder now in the init function.
@@ -66,7 +69,7 @@ def __init__(
        self._image_encoder = None
        self._text_encoder = None
        self._diffusion_model = None
-       self._decoder = None
+       self._decoder = Decoder(self.img_height, self.img_width)
StableDiffusionBase has a function named generate_image that takes in the encoded text and takes care of the iterative backward diffusion process. We can add a new decode_multiple parameter that defaults to False. If this parameter is set to True, the decoder will be called multiple times during the diffusion process, and each decoder output will be saved so we can later visualize the image generation process from pure noise to the final image. An example of what this produces will be shown in the next section.
@@ -137,6 +140,7 @@ def generate_image(
        unconditional_guidance_scale=7.5,
        diffusion_noise=None,
        seed=None,
+       decode_multiple = False
    ):
        """Generates an image based on encoded text.
@@ -165,6 +169,7 @@ def generate_image(
            seed: integer which is used to seed the random generation of
                diffusion noise, only to be specified if `diffusion_noise` is
                None.
+           decode_multiple: bool, whether to decode multiple times during the diffusion process. Defaults to False.
In the generate_image function, we can define a forward pass of the Decoder. This can simply be a function that takes in inputs and passes it to a Keras model call, or it can use the Variables defined outside of the function scope to transform the input. In this example, we will use the former since we already have a Keras defined Decoder model.
We add @sample.Wrapper() decorator to it in order for capsa-tensorflow to wrap it. The first time this function is called, capsa-tensorflow will alter the model weights, change the model architecture, and make the model risk-aware.
@@ -210,6 +215,11 @@ def generate_image(
        else:
            latent = self._get_initial_diffusion_noise(batch_size, seed)

+       @sample.Wrapper(n_samples=5)
+       def decoder_forward(latent):
+           return self._decoder(latent)
Before the iterative backward-diffusion loop, we initialize to lists risks_list and decoded_list. These lists will store the decoder’s output and risk.
@@ -222,6 +232,8 @@ def generate_image(
        alphas, alphas_prev = self._get_initial_alphas(timesteps)
        progbar = keras.utils.Progbar(len(timesteps))
        iteration = 0
+       decoded_list = []
+       risks_list = []
        for index, timestep in list(enumerate(timesteps))[::-1]:
            latent_prev = latent  # Set aside the previous latent vector
            t_emb = self._get_timestep_embedding(timestep, batch_size)
In the original code, the decoder’s predict_on_batch function is called. However, as we previously explained, we want to use the wrapped decoder_forward function we defined previously. Therefore, we replace the decoder’s predict_on_batch function with the decoder_forward function. The decoder_forward function is called with return_risk=True. Therefore, function returns a tuple of (decoded,decoded_risk).
@@ -257,10 +269,21 @@ def generate_image(
            iteration += 1
            progbar.update(iteration)

        # Decoding stage
-       decoded = self.decoder.predict_on_batch(latent)
+       decoded,decoded_risk = decoder_forward(latent,return_risk=True)
        decoded = ((decoded + 1) / 2) * 255
-       return np.clip(decoded, 0, 255).astype("uint8")

+       decoded = np.clip(decoded, 0, 255).astype("uint8")
+       decoded_list.append(decoded)
+       risks_list.append(decoded_risk.numpy())
+       return decoded_list,risks_list
Running the wrapped Stable Diffusion
To run the wrapped Stable Diffusion to generate images and their risks, you can use the following code snippet:
import os
from keras_cv.src.models import StableDiffusion

batch_size = 1
model = StableDiffusion(img_height=512, img_width=512, jit_compile=False)

crowded_enc = model.encode_text("A very crowded street") # First, we use the model's text encoder to encode the text prompt

decoded_list,risks_list = model.generate_images(crowded_enc, batch_size=batch_size,decode_multiple=False)
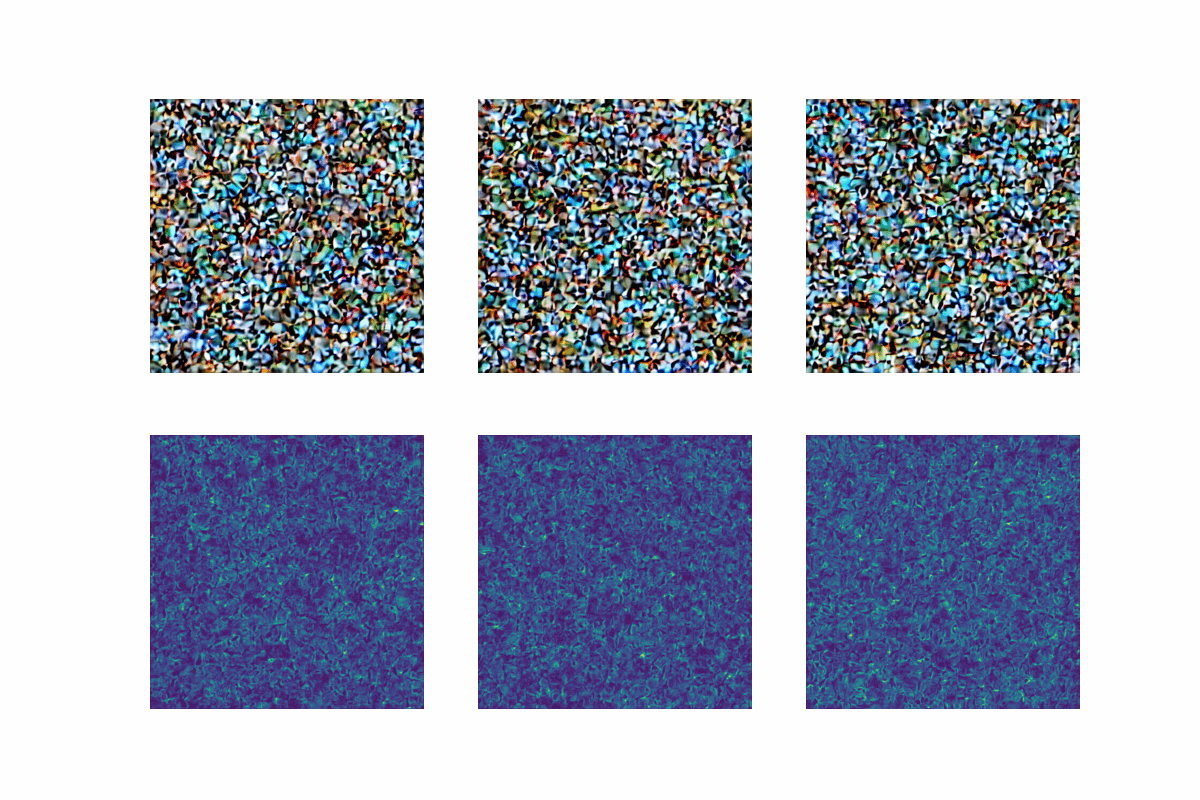
Remember, the original output of the decoder had the shape (512,512,3). When we wrap, the risk output we get will be over the original predictions, and therefore will also have the same shape (512,512,3). This makes it harder to interpret risk values, because we don’t only get them over each pixel, but also over each color channel. Therefore, we can take the mean of the risk values over the color channels to get a single risk value for each pixel. Alternatively, we can take the maximum. Each will result in a different interpretation of the risk values. However, they are both valid.
import numpy as np

last_prediction_risk = risks_list[-1]
max_reduced_risk = np.max(last_prediction_risk,keepdims=False,axis=-1)
mean_reduced_risk = np.mean(last_prediction_risk,keepdims=False,axis=-1)